Sunday, 19 October 2014

Spookily Easy Pumpkin Carving

Hello!
With the autumnal season in full swing it means only one thing: Halloween! Although I have never really celebrated Halloween, when the shops are filled with bundles of pumpkins, I can never resist buying a few to have some carving fun. 

I have always been envious of the people who are masters in the art of carving pumpkins producing elaborate designs, while I am creating the standard triangular eyed, zig-zag mouthed monster that never ends up looking remotely scary. So this year I decided to be a little bit clever (some may say cheat) and see if I could use a template to carve my pumpkin. Believe it or not it actually worked, so I would like to show you how I did it so that we can all be masters of pumpkin carving, if you aren't already one... 


This is what I needed to be able to carve my pumpkin. As you can see I managed to find a cat themed template! Just wonderful!


Before I start to cut my pumpkin, I will always draw a circle around the top as a guideline for the hole that allows you to gut the pumpkin. Its so much easier than doing it free hand and brilliant for us perfectionists! 


This is the worst part of the pumpkin carving for me! I hate the smell, texture and mess it makes! Plus is pretty hard work scraping all the flesh from the edges (this sounds awful!) 


 Once you have got past getting all the insides of the pumpkin out, you will be able to stand back and receive lots of satisfaction from creating a lovely clean pumpkin! And now the fun part begins! 

When I went on the Internet, I was surprised at how many templates for pumpkins there are! You will literally have hundreds of great free designs to choose from to be able to impress all your friends and family!


 This part is a little fiddly and is easier if you have another pair of hands to help with sticking the template to the side of your pumpkin. To stick my template I just used sellotape and a lot of patience.


Once you have your template in place, you need to score the pumpkin with a knife around the guidelines. You dont need to worry about pushing your knife all the way through at this stage as you will be able to take the template off the pumpkin after and see the lines you have created with the kinfe. Once you have done that, you can push the knife all the way through, cutting your design out and leaving you will a beautiful, detalied pumpkin! No more boring pumpkins!

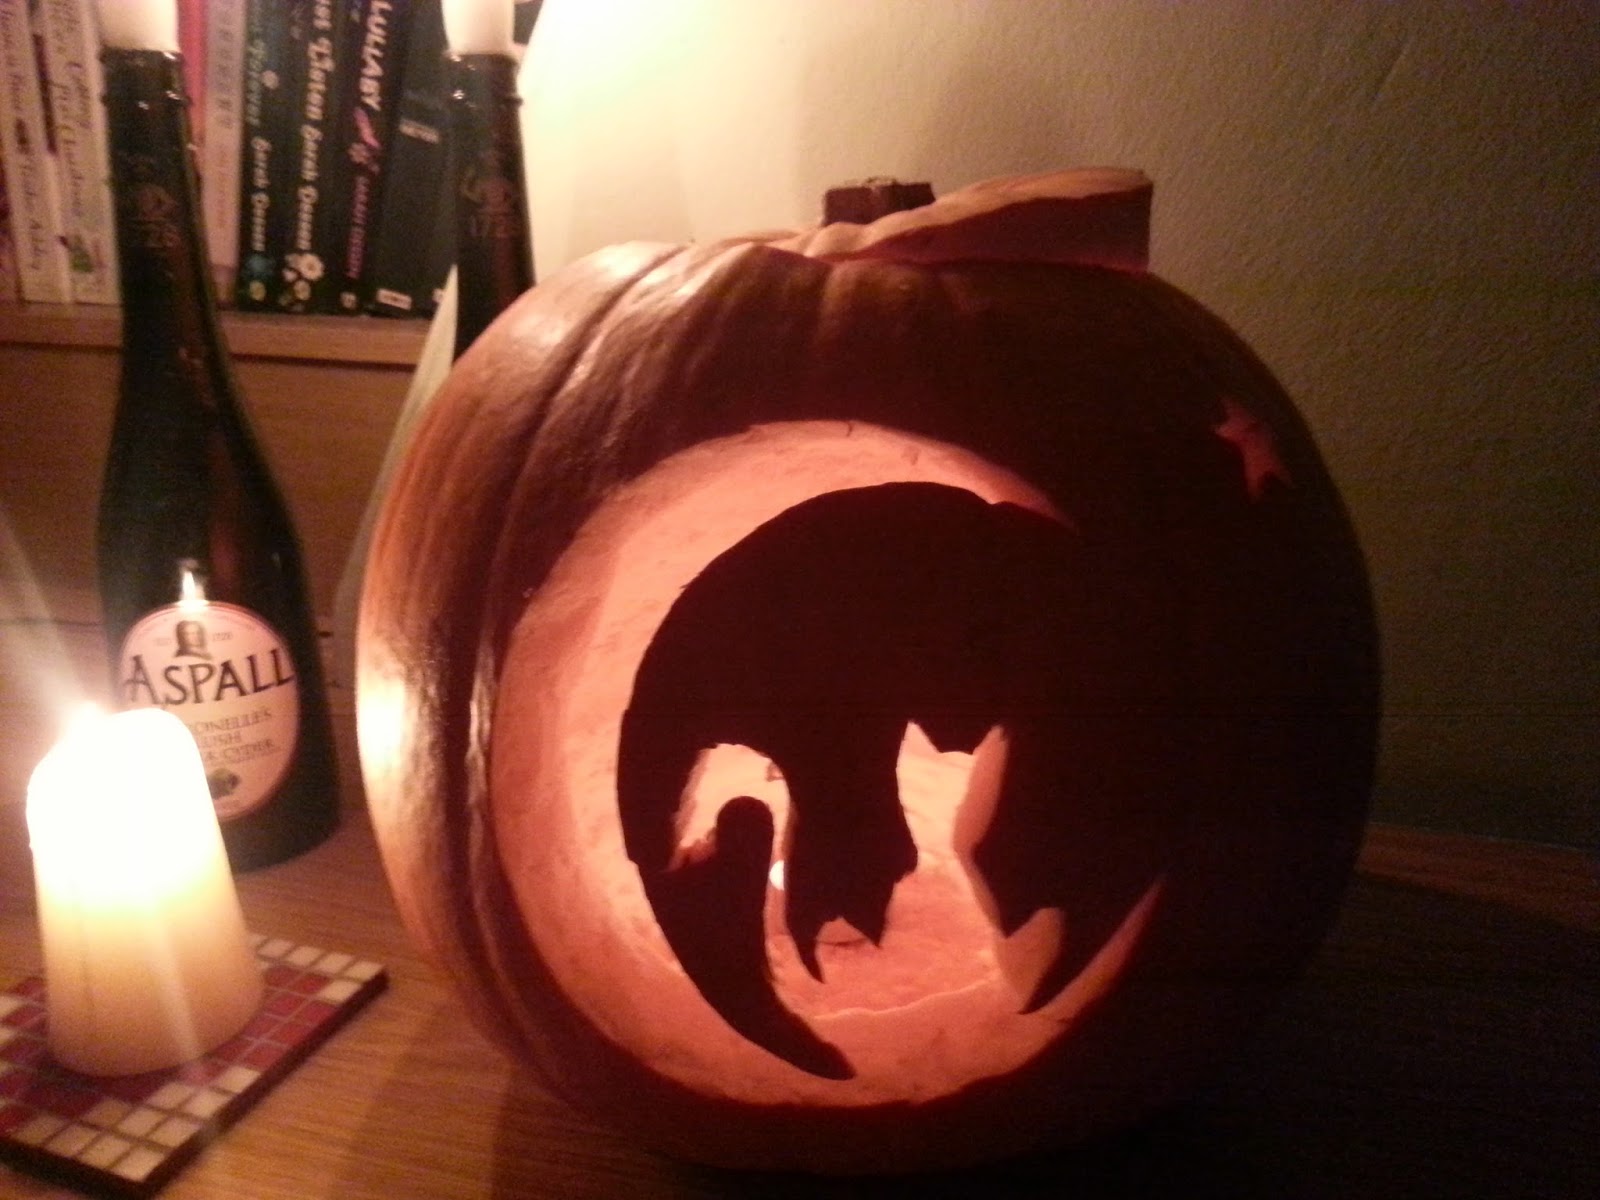
Here is the finished result of my pumpkin. I am actually very happy with it! 


Although I don't have a halloween party to show this off, I think it makes a really cute candle holder perfect for autumn and dark evenings. 

Have fun craving your pumkins! 

Cheerio!
x


Tuesday, 14 October 2014

London and Handmade Goodies

Hello!
A couple of weeks ago I went along to my sister in law's (to be) hen party in London. I love the hussle and bussle of London, there is always something going on around every corner. One minute you are in the mist of all the west end theatre shows and overly cool bars, and the next you are slap bang in the middle of China! (Chinatown counts right!?)  But I have to say, I do prefer the more laid back lifestyle of Kent with both the sea and countryside on your doorstep. Plus it means that going to places like London can always feel a bit special.

On our hen adventure, we stopped off at a very cute craft workshop where we all made a very cute sock animals (yes I said sock!) I was a little terrified at the thought of having to create something that involved sewing, but it was much easier than I expected! The whole creation only included one sock, a little felt for eyes and ears and nose, some thread and of course stuffing! It was so simple that I am thinking about creating more sock based animals.


Unsurprisingly, I decided to make a cat and this is my attempt. Its not perfect, and i like to think that its not meant to be. It has that handmade feel about it! I think they are so cute, and if I do decided to  make more, they could be given as gifts for little ones! They are super soft and would look just adorable cuddled up in a pram with a baby! 

When we arrived at the craft workshop, it had been set up so cute, with quirky tea cups and glorious centre pieces that held a selection of scrummy cakes;I just had to take a picture of it before we ruined it while creating our masterpieces. 


Going on a craft workshop as part of hen party is an activity i would definitely recommend! Hen parties often mean you don't know everyone in the group, so doing an activity like this really breaks the ice. It also gets you ready for your night out so you can really let loose and enjoy yourself!

Keeping with the handmade theme, at the weekend my sister and I went to an amazing paint your own pottery coffee house. I have been to paint your own pottery a few times and absolutely loved it so i knew that this would be right up my street. It provides you with hours of fun, literally! We spent a good 2 hours deciding what our pottery design would be. We had both chosen to paint plates, and since the Christmas season is just around the corner, we decided to put the two togehter and make Christmas plates! There was so much to choose from! From the paint colours, to stencils we could use. We opted to use stenclis because the thought of doing the whole design freehand was far too stressful!

What makes this better, is that it only cost £8.50 per person. In total we stayed for around 4 hours and was well worth the money! Below are the finished products, and I have to say I am pretty impressed!


While we were blissfully painting away, we were brought tea and cake, which made the experience 10 times more exciting. It was a perfect way to spend a weekend with my sister! Have you ever been to a craft workshop or paint your own pottery? Isn't it amazing!? 

Cheerio! 
x

Tuesday, 7 October 2014

Beautiful Beauty Reviews

Hi! 
Makeup is everywhere nowadays, and it can be difficult to decide which to pick when you have so much to choose from with so many different price tags. I always find it helpful looking up reviews of products before I buy because I, like many people, have bought make up that is just rubbish! So to try and help a few people out, I will be reviewing four of my favourite makeup products that are both staple pieces and great for this time of the year!


The first product is from GOSH Cosmetics and is the 'Eye Brow Kit' which retails at £8.49. Before I bought this product, I always used a pencil to fill in my eye brows, but now I've tried this kit, I will never go back! For me, applying with powder rather than a pencil gives a much more natural look. Its easy to apply and difficult to make your brows look OTT,  which is always a risk when applying with a pencil applicator! The kit has three different shades from light to dark and is really easy to match to your brow colour. Sometimes, I will blend two colours together which is give you even more of a colour range if needed. It also comes with wax to hold your brows in place which is just wonderful!  


The set does come with a cute angled brush, but I have lost mine! Having the brush plus a little mirror on the lid makes this perfect to carry around in your handbag during the day. Not that you will need it, I find that the product has really good hold and I rarely reapply during the day (unless I've been rubbing my face lots!) I am so glad I found this eye brow kit, I will never go back to pencil! Well done GOSH cosmetics! 


Next up is MAC Cosmetics with the mascara 'Extended Play Gigablack Lash' and retails at £14.50. This is my all time favourite mascara. I have used so many mascaras in the past, and I have never found one as good as this product. When I first saw it, I didn't think i would like it as it had quite a thin brush and thought that because it wasn't nice and thick, it wouldn't do the job. I was wrong. Very wrong! It makes your lashes perfectly black with so much length without making your lashes feel clumpy and heavy. The thin brush also makes application easier, you can really get into the corners of your eyes.The wear on the mascara is great, I don't think I have ever reapplied during the day.


The product itself is fairly small, so I thought that it wouldn't last me very long. Again, I was wrong! I have had my mascara for around 5 months and its still going strong! I use it everyday. It is well worth the money for a great product that will last you a long time and give you lushly extended lashes.Well done MAC! 


MAC cosmetics is next up again with a beautiful blush that is perfect for this time of year! It's in the shade Stubborn and is the Pro Longwear Blush. It retails at £20 which is a little more expensive than your usual blush. However, there is a reason for this other than being amazing...It is a much more intense colour, meaning that you need to put hardly anything on your cheek for it to show and blend into your skin. I have had this product for over 5 months and I don't think I've even made a dent in it. I use it almost everyday. This blush also has the advantage that it never need reapplying during the day. I have had many blushes in the past that have needed reapplying during the day, but this product is just stuck to your cheek like glue! 


The colour is so lovely, as though you have just been on a long walk on a winters day and your cheeks are the perfect flushed colour. Its a very autumnal! It is definitely the best blush I've used and I will be buying it again! (If i ever get through it all!) Another great product by MAC!

Last but not least is a product from The Body Shop. It is the Moonstone eyeshadow Unfortunately, the don't seem to sell it anymore, but if you click on the link, it will bring up a similar match. This eye shadow is perfect for this time of year as it has a shimmer to it. It applies well and has good wear.


 I love digging this eyeshadow out for the autumn/winter time! The colours are lovely and go with pretty much all outfits. Having a light and dark side means you can achieve a lovely smokey look! Well done Body Shop!

 
I hope that these reviews have been helpful and have enjoyed reading them. What are your favourite makeup products that will always be found in your beauty bag?

Cheerio!
x


Monday, 6 October 2014

Crazy Cat Lady

Hi! 
Just a quickie! I wanted to post a photo that I came across on my news feed on Facebook and it was too good not to share with you! I basically need one of these... 


Hope it made you smile and ease those Monday blues! If you are you a crazy cat lady like me, it will have definitely helped! 

Cheerio!
x

Sunday, 5 October 2014

Nails, Nails & more Nails

Hello! 
By looking at my previous posts, you may notice that I really enjoy being creative and one of my loves in life is nail painting and creating various designs that make my nails stand out,which usually includes some form of glitter! Although I really love getting my nails done, it can be quite expensive for us normal folk. As an alternative, I happily spend an afternoon painting my nails and trying out new designs. So I thought that it might nice to share some with you, explain how I do it and how easy it can be for an armature like me!

I created these first nails for a holiday that I went on this year, because who doesn't like having lovely nails when you are lounging around by the pool! I wanted to create something that looked like a sunset and it was super easy to do with a really lovely outcome.


First of all, I picked three colours that resembled a sunset. I chose pink, orange and yellow. I painted my nail with a plain white to start to give a nice base and make the colours pop that little bit more. Next I used a sponge ( nothing fancy, I just stole one from under the sink that we use for washing up!) and began painting a small line of pink at the edge of the sponge, next overlapping with a line of orange and then finally overlapping again with a line of yellow. I then took the sponge and rolled it across my nail making sure the yellow was at the tip of my nail. 


You have to be fairly quick with this because as you know sponges are very absorbent and if you aren't quick enough, it will drink all your lovely nail varnish leaving not a huge amount for your nails! I will usually repeat this process once more to give it a better covering. While the paint is still wet, take your best clear top coat varnish, because we don't want all this hard work to chip away the next day, and apply. The reason you need to apply the top coat while it is wet is because it blends the three colours together nicely giving it that sunset look. And that is all it takes! It might take a few practise runs to get it the way you want, but the outcome in the end is so worth it!

You can see that there is also a little glitter bow that I added for decoration. I bought the bow from eBay for just 99p! The temptation to have a little glitter in the sun was too much to resist! I glued it on with a little nail glue and sealed it with top coat. 

If you wanted to make this design a little less summery now that we are in the lovely season that is autumn, you can change the colours around with perhaps dark to light purples. It works with so many colours you can really get your creative bones working! 


The second design I wanted to show you is a far more Christmassy and of course includes glitter! 


For this, I started off by applying fake plain stick on nails. I did this because my nails were very short and I think this look is better with longer nails. Again, this is such an easy design to create that has amazing results and looks just perfect for the run up to Christmas. I used a set called 'Bling it on Rocks' by Nails Inc that has two gorgeous pots of glitter, sliver and black, which i used for the tips of the nail.
 
Once I had all my nails on (that sounds awful!) I applied two coats of very Christmassy red nail varnish. After applying the second coat and while it was still wet, I poured a little of the sliver glitter on the tip of my nail and used a little brush, much like a makeup brush, to sweep the glitter up my nail. Be careful to not pour too much glitter on the nail as you only want a trail of glitter going up your nail. 


Once I had completed this with each of my nails, I applied my clear top coat to hold all the glitter in place and that was it! So simple and so wonderful!

This is only two of many designs that I like to create so if you would like to see more (one being Disney themed!!) let me know in the comments below! Remember I'm not a professional so literally anyone can do it!

Cheerio! 
x


Friday, 3 October 2014

Its beginning to look a lot like...Autumn!

Hi!

Its been looking very autumnal recently, so when I went out on a walk at the weekend to feed the ducks with some old bread (much more fun than throwing it away!)  I took my camera with my to take some pictures. I wanted to share with you a few of my favourite pictures. I'm no photographer, but I do enjoy taking the occasional picture :)


Every year I will usually collect a few conkers because I was told that they are a good repellent for spiders. Since I am deathly scared of the eight legged beasts, there hasn't been a spider season that has gone by that hasn't had my house filled with conkers in very corner. During my walk there were lots of conker trees so I decided to collect a few and see what I could do with them, other than using them to repel the spiders. Conkers come in all different shapes and sizes and have a really nice colour when they are nice a fresh, so I think they look great collected together in a glass bowl and put on the side as a cute little autumn decoration. Here it what you could do with just a few conkers and a very small amount of creativity skills! 


I think the conkers look really great between two candles - it gives it that extra touch and make it feel very autumnal! It could also be used as a really lovely centre piece if you are having a dinner party!


Conkers are so simple looking, i think they look equally as good on there own.


This just shows how you need hardly any creativity to be able to give yourself a unique, autumn themed centred piece! 

Cheerio!

Wednesday, 1 October 2014

#BodyImage


When I first imagined what my blog would be like and the kind of things I would write about, I never really thought I would be writing about more serious topics. I wanted to keep the blog fun and light hearted because I just saw it as a bit of a hobby. But I was having what I call an 'ugly day' and it really made me want to write about body image. It’s just such a big part of life. You wake up, you look at yourself. You get dressed, you look at yourself. You walk past a shop window, see your reflection, and look at yourself. You brush your teeth, you look at yourself...you get the gist. If you aren't happy with the way you look, it might seem like you are constantly reminded of it; whether that be your body shape, the way your hair looks, the shape of your nose or even your eyebrows (it’s a facial nemesis for some!) 

It might feel like everybody is going to notice that you’re having a bad hair day, or that your jeans aren’t fitting the way you want, but they don't. Nobody is really bothered. I have days sometimes when I don’t want to leave the house, but regardless of if I felt beautiful or ugly, the people that see me won't notice any difference. It's all about you and how you carry yourself. There is no right or wrong way with how we are meant to look. Everybody is different, people will always be smaller or bigger in size, have straighter or wonkier teeth, have longer or shorter legs, and that is what is amazing about us. We are all unique and have people that love us no matter what we look like. 

We need to have the confidence of little ones. Do you remember caring about how your arms looked? I doubt you did...because you were too interested in just living your life and having fun. I know that it’s hard when you are having a bad day to make yourself not worry and feel good about yourself and I need to take a leaf out of my own book on my 'ugly days'; but it’s so important to be able to feel comfortable in your own skin. And remember that everyone has those days when they don’t feel their best. I bet even Beyoncé does! And the Queen! 

I feel like it should be a challenge for anyone that reads this blog (whether thats one person or ten) and me, to think about the bigger picture when they are having an off day. To look at ourselves in the mirror, smile and say "I’m beautiful and unique". There is no one else like there out you, so you have to make sure you show the world the best you there is at every opportunity! Smiling can really change the way you feel, even if you are feeling rubbish. Apparently is scientifically proven! 

I didn't want to ramble on about it too much because the body confidence topic is everywhere now, but i hope that this has helped at least one person who is feeling a bit rubbish! Remember you are lovely! (said to the 'remember your a womble' theme tune)

Cheerio!

P.S. This is a great soundtrack for when you are getting ready in the mornings or need just a little pick me up!
 #loveyourself 


Monday, 29 September 2014

Mini Storage Project


Hi! 
So currently I am in an in between stage of being finished at university and waiting to start my new job. For anyone that has been in this situation, you know it can be a little boring and some days find yourself just watching rubbish daytime TV- all day! I realised that I needed to make the most of this precious freedom, so I decided to get a little bit creative! My room is filled with so much stuff that is not really organised or put away neatly so I was inspired to have a mini storage project.

I have a really big cupboard in my room that I wasn't able to use for a really long time because it was jam packed with my sister’s stuff, whom no long lives at home. I managed to persuade her to dive into the cupboard and empty it out and take it all back to her house, giving me a whole new area to play with! In the process I also decided to have a clear out of my draws and managed to completely empty two draws, giving me so much extra room to be able to store things away neatly. I got started with measuring the cupboard and draws so I knew what size storage boxes to get and I set off to Wilkinson's. I spent a good half an hour in the shop pulling out various boxes, deciding how they would fit in the space I had and just generally just making a huge mess in the shop...

When I got all the boxes I needed and found some cute little trays (for only £2, bargain!) I was able to start organising my room and making it look much clearer. I know it might sound boring, but it was so much fun!! There is something really satisfying about organising things and having them fit neatly all together and knowing where everything is, instead of having to spend 10 minutes looking for your favourite clutch bag. 


I wish I had taken a picture of what this cupboard used to look like. It was one big mess. Now it is a beautiful collection of my favourite things, packed away neatly, all in one place at arms reach.  Very satisfying... 


Bits like my hairdryer and straighteners used to just sit on my long desk, and now they have a new home together in this cute little basket. 


I had lots of crafty bits hanging around my room; some that I didn’t even realise were there. Now they are all together in this basket, I can just take it out when I’m feeling creative and be able to see everything I have. (Can you see the amount of glitter pots I have...? I'm truly obsessed with glitter!)


These are my two favourite baskets! Before, my makeup was all crammed and overflowing into a tiny makeup bag that made it difficult to see what I had. Now it sits all perfectly and neatly together in my draw and out of the way when I don’t need it. It’s also really helpful because I can see what I have. I didn't realise I had so many nice eye shadows! I also put my makeup brushes into a basket because I think it looks much neater than when I was storing it in a rubbish old cup!


My heels! They used to sit in my room under my radiator, (collecting dust most of the time-someone take me out!) I managed to find a long enough clear box that allowed me to put all my shoes away. This was great because my room is fairly small and freeing up the floor space has made my room feel much clearer! 


There were other boxes that I didn't take pictures of that included: a book box, a memory box and even a miscellaneous box, which I thought was genius! Now whenever I go in my room it makes me very happy. I feel like it’s a much more usable space for me now, and having a pretty clear room also seems to help me sleep better! 

I hope I have inspired some of you who need a little project and like me, have stuff everywhere! I promise that it’s a project that will bring you lots of satisfying pleasure!! 

Cheerio!